As a seasoned technician with over a decade of hands-on experience in electric cooker assessment, I understand the frustration and concern that comes with a damaged appliance power cord. A frayed wire, a broken plug, or even internal cord damage can render your electric cooker unusable and, more critically, pose significant safety risks. While the thought of fixing an electrical appliance might seem daunting, many common power cord issues can be safely addressed with the right knowledge and tools. This comprehensive guide will walk you through identifying cord problems, the steps for safe repair or replacement, and when it’s essential to seek professional help, ensuring your electric cooker is back to safely preparing meals.
Understanding the Risks of a Damaged Electric Cooker Power Cord
A damaged power cord isn’t just an inconvenience; it’s a serious safety hazard. The insulation on power cords is designed to protect you from the electrical current flowing through the wires. When this insulation is compromised, it can lead to several dangerous situations:
- Electric Shock: Exposed wires can deliver a dangerous electric shock upon contact.
- Fire Hazards: Frayed or short-circuited wires can overheat, spark, and ignite nearby flammable materials, leading to fires.
- Appliance Malfunction: Inconsistent power supply due to a damaged cord can cause your electric cooker to operate improperly or fail completely, potentially damaging internal components.
- Tripped Breakers: A short circuit from a damaged cord will often trip your circuit breaker, cutting power to the outlet and possibly other areas of your home.
It’s crucial to address any damage promptly to prevent these risks. Never ignore a compromised power cord.
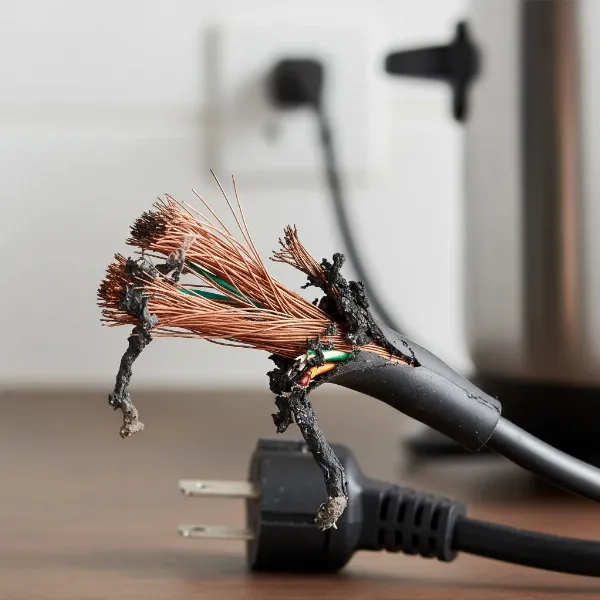 Close-up of a severely damaged electric cooker power cord with exposed wires.
Is DIY Repair Right for You? Assessing the Damage
Before attempting any repair, a thorough assessment of the damage is paramount. The type and extent of the damage will determine whether a DIY fix is feasible and safe, or if professional intervention is required.
Minor Damage (Potentially DIY):
- Superficial Fraying: Small cuts or nicks in the outer insulation where no internal wires are exposed.
- Damaged Plug Prongs: A bent or broken prong on the plug itself, but the cord leading to it is intact.
- Damage Near the Plug/Appliance Entry: A clean cut or fraying very close to either end, allowing for a new plug or internal cord connection without splicing the main cable.
Major Damage (Call a Professional or Replace Appliance):
- Exposed Internal Wires: Any visible copper or colored wires beneath the outer insulation.
- Chewed or Severed Cord: If a pet has chewed through the cord, or it’s been cleanly cut in the middle. Splicing an appliance cord, especially an extension cord, can be risky. While technically possible, it often creates a weak point that sacrifices durability and safety.
- Melted or Burned Areas: Signs of overheating on the cord or plug.
- Internal Appliance Damage: If the cord damage extends into the cooker’s casing, or if the cooker itself shows signs of malfunction beyond the cord.
- Uncertainty: If you are unsure about any aspect of the repair or feel uncomfortable working with electricity, always consult a professional.
Important Considerations: For extension cords, many experts advise against splicing them. Instead, it’s safer to replace the entire cord or fit a new plug if the damage is near an end, turning one long cord into two shorter, safe ones. For appliance cords, replacing the entire cord is often the safest and most durable solution for significant damage.
Essential Tools and Materials for Power Cord Repair
Having the right tools is crucial for a safe and successful repair. Here’s what you might need:
- Insulated Pliers/Wire Cutters: For cleanly cutting through damaged cord sections.
- Wire Strippers: Essential for removing insulation from wires without damaging the copper strands underneath. Match the stripper gauge to your wire size.
- Screwdrivers: Philips and flathead, for opening appliance panels or replacement plugs.
- Electrical Tape: High-quality black vinyl electrical tape for insulating minor damage or re-wrapping connections.
- Heat Shrink Tubing & Heat Gun/Hair Dryer: Offers a more durable and aesthetically pleasing insulation than tape for splices or minor damage.
- Replacement Plug: If only the plug is damaged. Ensure it has the same amperage rating as the original.
- Replacement Power Cord: If the entire cord needs replacing. Match the gauge and length to the original.
- Multimeter (Optional but Recommended): For testing continuity and confirming connections.
- Safety Gear: Always wear cut-resistant gloves and safety glasses when working with wires and tools.
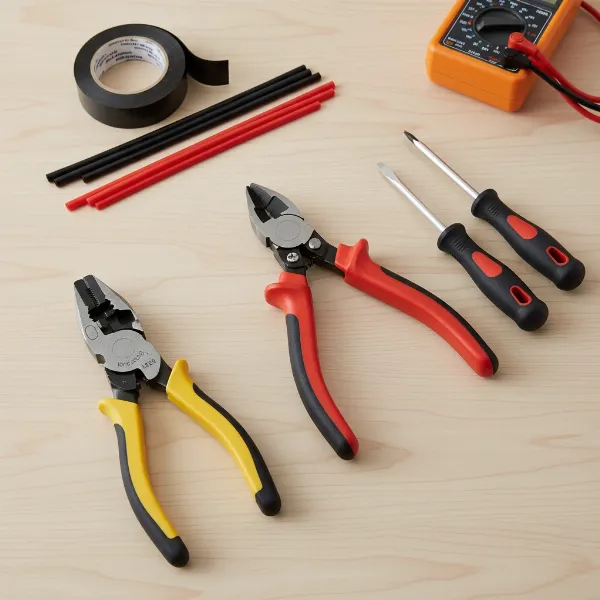 Assortment of tools for electrical repair: wire cutters, strippers, screwdrivers, electrical tape.
Step-by-Step Guide: Repairing Minor Cord Damage (Superficial Fraying)
For superficial nicks or scrapes in the outer insulation where no internal wires are exposed, a simple repair can suffice.
- Disconnect Power: Unplug your electric cooker from the wall outlet. For added safety, consider switching off the corresponding circuit breaker.
- Inspect Thoroughly: Examine the entire length of the cord to ensure the damage is indeed minor and superficial. There should be no exposed metal wires.
- Clean the Area: Wipe the damaged section with a clean, dry cloth to remove any dirt or grease.
- Apply Electrical Tape: Wrap the electrical tape tightly around the damaged section, extending a little beyond the fray on both sides. Apply several layers to ensure robust insulation.
- Alternatively, Use Heat Shrink Tubing: If you have heat shrink tubing, slide a piece that’s slightly larger than the cord diameter over the damaged area. Use a heat gun or even a hair dryer on a high setting to shrink the tubing tightly around the cord, creating a sealed repair.
Step-by-Step Guide: Replacing a Damaged Plug
If the damage is limited to the plug end, replacing it is a straightforward and safer alternative to splicing.
- Disconnect Power: Unplug the cooker. Switch off the circuit breaker if you feel more secure.
- Cut Off the Old Plug: Using wire cutters, cut the cord a few inches below the damaged plug.
- Prepare the Cord:
- Strip about 1 inch (2.5 cm) of the outer insulation from the end of the cord using wire strippers to expose the individual insulated wires inside (typically two or three wires: hot, neutral, and ground).
- For each individual wire, strip about ½ to ¾ inch (1.3 to 1.9 cm) of its insulation to expose the copper strands.
- Gently twist the exposed copper strands of each wire together to prevent fraying.
- Open the New Plug: Unscrew and open the casing of your replacement plug. You’ll typically see screw terminals. These are usually color-coded or marked:
- Gold/Brass screw: For the “hot” (live) wire (often black or red).
- Silver screw: For the “neutral” wire (often white or blue).
- Green screw: For the “ground” wire (always green or green/yellow striped).
- Note: Ensure the replacement plug rating matches the original.
- Connect the Wires:
- Thread the prepared end of the power cord through the opening of the new plug casing.
- Connect the ground wire (green) to the green screw, wrapping the wire clockwise around the screw and tightening it firmly.
- Connect the neutral wire (white/blue) to the silver screw.
- Connect the hot wire (black/red) to the gold/brass screw.
- Ensure no stray copper strands are touching other terminals.
- Assemble the Plug: Reassemble the plug casing, making sure it’s securely fastened.
- Test: Plug the repaired cord into a working outlet and test your electric cooker.
Step-by-Step Guide: Replacing the Entire Power Cord (Advanced Repair)
This method is ideal for extensive damage, especially if it’s closer to the appliance body. It requires accessing the internal wiring of your electric cooker.
- Prioritize Safety: Unplug the electric cooker. Crucially, turn off the corresponding circuit breaker at your home’s electrical panel. This eliminates any chance of live wires during the repair.
- Access the Appliance Interior: Most electric cookers have an access panel on the back, secured by screws. You may need a screwdriver to remove this panel. Carefully place the removed parts aside.
- Document Existing Wiring: Before disconnecting anything, take a clear photograph of how the old power cord wires are connected to the cooker’s terminal block. This will be your guide for connecting the new cord correctly. Pay attention to wire colors (e.g., green for ground, white for neutral, black/red for hot in North America; green/yellow for ground, blue for neutral, brown for live in Europe).
- Disconnect the Old Cord: Loosen the screws or nuts securing the old power cord’s wires to the terminal block. Carefully remove the wires and pull the old cord free.
- Prepare the New Cord:
- Ensure your new power cord is the correct type and gauge (thickness) for your electric cooker, matching the original.
- Strip about 1 inch (2.5 cm) of the outer insulation from the end of the new cord that connects to the appliance.
- Strip ½ to ¾ inch (1.3 to 1.9 cm) of insulation from each individual wire, then twist the exposed copper strands.
- Connect the New Cord:
- Thread the prepared end of the new cord through the strain relief (a component that prevents the cord from being pulled out of the appliance) on the cooker’s casing.
- Following your photograph, connect each wire of the new cord to its corresponding terminal on the appliance’s terminal block. Wrap the wire clockwise around the screw and tighten firmly, ensuring no stray strands.
- Expert Insight: “Always match the wire colors exactly when replacing an appliance cord. Green to green, white to white, and black/red to black/red. This ensures proper grounding and functionality, minimizing electrical hazards.” – Lan, Electric Cooker Review Technician.
- Secure and Reassemble: Tighten the strain relief to secure the new cord. Replace the access panel, ensuring all screws are fastened.
- Test Safely: Plug the electric cooker back into the wall outlet. Turn the circuit breaker back on. Test the appliance to ensure it powers on and functions correctly. Listen for any unusual sounds or smells, and immediately disconnect power if anything seems amiss.
Important Safety Precautions During Repair
Working with electricity demands respect and caution. Adhere to these safety measures throughout the repair process:
- Always Disconnect Power: Unplug the appliance and consider turning off the circuit breaker. This is the absolute first step for any electrical repair.
- Inspect Thoroughly: Before and after repair, meticulously inspect the cord for any remaining damage or improperly insulated areas.
- Use the Right Tools: Utilize insulated tools designed for electrical work.
- Match Wire Gauges: Ensure any replacement cords or plugs are rated for the same amperage and voltage as the original to prevent overheating.
- Insulate All Exposed Wires: Never leave copper wires exposed. Proper insulation with electrical tape or heat shrink tubing is critical.
- Double-Check Connections: Ensure all connections are tight and secure. Loose connections can lead to arcing and fire hazards.
- Avoid Over-Tightening: While connections should be firm, over-tightening screws can damage wires.
- No Water or Moisture: Ensure your work area and the appliance are completely dry.
- Don’t Overload: After repair, ensure you are not plugging the cooker into an overloaded circuit.
When to Call a Professional Electrician
While many cord repairs are manageable for a DIY enthusiast, some situations warrant professional help:
- Extensive Internal Damage: If the damage is deep within the appliance or involves complex internal wiring beyond the cord.
- Uncertainty About Wiring: If you are at all unsure about wire identification, connection points, or the overall safety of the repair.
- Appliance Under Warranty: Attempting a DIY repair might void your appliance’s warranty.
- High-Power Cookers: Some larger or more powerful electric cookers may have complex wiring systems best handled by certified electricians.
- Persistent Issues: If the cooker continues to malfunction or show signs of electrical problems after your repair, it’s time to call an expert.
Your safety is paramount. When in doubt, call a qualified electrician to perform the repair.
Conclusion
A broken power cord doesn’t necessarily mean the end for your beloved electric cooker. By carefully assessing the damage and following proper safety protocols, you can often repair or replace a damaged cord, extending the life of your appliance and saving on replacement costs. Whether it’s a quick fix with electrical tape for superficial fraying, replacing a faulty plug, or undertaking a more involved full cord replacement, empowering yourself with these skills can be incredibly rewarding. Remember, safety is always the top priority—never hesitate to seek professional assistance if a repair feels beyond your comfort or expertise. Has repairing an electric cooker cord ever saved you from buying a new appliance?
Frequently Asked Questions
Can I use duct tape on a power cord?
|
Our Picks for the Best Electric cooker in 2026
As an Amazon Associate I earn from qualifying purchases.
|
||
| Num | Product | Action |
|---|---|---|
| 1 | Dezin Hot Pot Electric with Steamer Upgraded, Non-Stick Sauté Pan, Rapid Noodles Electric Pot, 1.5L Mini Pot for Steak, Egg, Fried Rice, Ramen, Oatmeal, Soup with Power Adjustment |

|
| 2 | Dezin Hot Pot Electric Upgraded, Non-Stick Sauté Pan, Rapid Noodles Electric Pot, 1.5L Mini Portable Hot Pot for Steak, Egg, Fried Rice, Ramen, Oatmeal, Soup with Power Adjustment |
|
| 3 | Dezin Hot Pot Electric with Steamer Upgraded, Non-Stick Sauté Pan, Rapid Noodles Electric Pot, 1.5L Mini Pot for Steak, Egg, Fried Rice, Ramen, Oatmeal, Soup with Power Adjustment |
|
| 4 | Pink 1L Ceramic Slow Cooker with Steamer Basket, 200W Mini Electric Stew Pot, 24-Hour Delayed Start & Auto Keep-Warm, Household Kitchen Safety Dry-Burn Protection Porridge & Soup Pot |
|
| 5 | Elite Gourmet EG808 8” x 8" Non-stick Electric Skillet, Dishwasher Safe with Tempered Glass Vented Lid, Rapid Heat Up, 600W, Black |
|
| 6 | Dezin Hot Pot Electric with Steamer Upgraded, Non-Stick Sauté Pan, Rapid Noodles Electric Pot, 1.5L Mini Pot for Steak, Egg, Fried Rice, Ramen, Oatmeal, Soup with Power Adjustment |
|
| 7 | Dezin Hot Pot Electric with Steamer Upgraded, Non-Stick Sauté Pan, Rapid Noodles Electric Pot, 1.5L Mini Pot for Steak, Egg, Fried Rice, Ramen, Oatmeal, Soup with Power Adjustment |
|
| 8 | Green 1L Mini Slow Cooker with Steamer Basket, 200W Smart Ceramic Electric Stew Pot, 24-Hour Timer & Auto Keep-Warm, Dry-Burn Protection, Kitchen Cooking Appliance |
|
| 9 | Instant Pot Duo 7-in-1 Mini Electric Pressure Cooker, Slow Rice Cooker, Steamer, Sauté, Yogurt Maker, Warmer & Sterilizer, Includes Free App with over 1900 Recipes, Stainless Steel, 3 Quart |
|
| 10 | AMZCHEF Portable Induction Cooktop 20 Temperature & Power Levels, 1800W Induction Stove Burner with 6.8" Heating Coil, Low Noise Hot Plate Single Electric Cooktops Countertop Stove with Timer |
|
No, you should never use duct tape on a power cord. Duct tape is not designed to withstand heat or insulate electricity, and it can actually worsen the problem by trapping heat or deteriorating over time, leading to greater hazards like fire or electric shock. Always use proper electrical tape or heat shrink tubing for electrical repairs.
How do I know what kind of replacement cord to buy for my electric cooker?
To buy the correct replacement cord, check your electric cooker’s owner’s manual or the label near the original cord’s entry point for its voltage and amperage ratings. You’ll need a cord with the same, or higher, ratings (gauge/thickness) and the correct plug configuration (e.g., 3-prong or 4-prong) for your outlet.
Is it always safer to replace the whole cord?
For significant damage, especially frayed wires, or damage close to the appliance body, replacing the entire cord is generally the safest and most durable solution. While minor repairs like replacing a plug end can be done, a full cord replacement eliminates potential weak points in the middle of the cable.
What do the wire colors in a power cord mean?
In North America, common wire colors are: green for ground, white for neutral, and black (or red) for hot/live. In many other regions (e.g., Europe), green/yellow is for ground, blue for neutral, and brown (or black/grey) for live. It’s crucial to match these colors correctly during replacement.
Can I fix a broken extension cord by splicing it?
Splicing a broken extension cord is generally not recommended for safety reasons. Even if reconnected, the splice can be a weak point, prone to breaking or moisture intrusion, which can lead to hazards. It’s safer to cut the cord at the break and fit new plugs to create two shorter, safe extension cords, or simply replace the entire extension cord.