Imagine consistently achieving perfectly cooked, tender, and juicy meals at home, rivaling those from a gourmet restaurant. This culinary dream is often realized through sous vide cooking, a precise method that locks in flavor and moisture like no other. While dedicated immersion circulators are popular, many home cooks wonder if their existing electric cooker can step up to the challenge. The good news is, with a little ingenuity and understanding of the principles, you can absolutely explore the world of sous vide using your trusty electric cooker.
This guide will demystify the process, from understanding the core concepts of sous vide to setting up your electric cooker, ensuring safe and delicious results. We’ll delve into the necessary gear, walk you through the cooking steps, and highlight the advantages and limitations of this DIY approach, empowering you to unlock new culinary possibilities in your own kitchen.
Understanding the Essence of Sous Vide Cooking
|
Our Picks for the Best Electric cooker in 2026
As an Amazon Associate I earn from qualifying purchases.
|
||
| Num | Product | Action |
|---|---|---|
| 1 | Dezin Hot Pot Electric Upgraded, Non-Stick Sauté Pan, Rapid Noodles Electric Pot, 1.5L Mini Portable Hot Pot for Steak, Egg, Fried Rice, Ramen, Oatmeal, Soup with Power Adjustment |

|
| 2 | Elite Gourmet EG808 8” x 8" Non-stick Electric Skillet, Dishwasher Safe with Tempered Glass Vented Lid, Rapid Heat Up, 600W, Black |
|
| 3 | Dezin Hot Pot Electric with Steamer Upgraded, Non-Stick Sauté Pan, Rapid Noodles Electric Pot, 1.5L Mini Pot for Steak, Egg, Fried Rice, Ramen, Oatmeal, Soup with Power Adjustment |
|
| 4 | Dezin Hot Pot Electric with Steamer Upgraded, Non-Stick Sauté Pan, Rapid Noodles Electric Pot, 1.5L Mini Pot for Steak, Egg, Fried Rice, Ramen, Oatmeal, Soup with Power Adjustment |
|
| 5 | Dezin Hot Pot Electric with Steamer Upgraded, Non-Stick Sauté Pan, Rapid Noodles Electric Pot, 1.5L Mini Pot for Steak, Egg, Fried Rice, Ramen, Oatmeal, Soup with Power Adjustment |
|
| 6 | Dezin Hot Pot Electric with Steamer Upgraded, Non-Stick Sauté Pan, Rapid Noodles Electric Pot, 1.5L Mini Pot for Steak, Egg, Fried Rice, Ramen, Oatmeal, Soup with Power Adjustment |
|
| 7 | Green 1L Mini Slow Cooker with Steamer Basket, 200W Smart Ceramic Electric Stew Pot, 24-Hour Timer & Auto Keep-Warm, Dry-Burn Protection, Kitchen Cooking Appliance |
|
| 8 | Pink 1L Ceramic Slow Cooker with Steamer Basket, 200W Mini Electric Stew Pot, 24-Hour Delayed Start & Auto Keep-Warm, Household Kitchen Safety Dry-Burn Protection Porridge & Soup Pot |
|
| 9 | AMZCHEF Portable Induction Cooktop 20 Temperature & Power Levels, 1800W Induction Stove Burner with 6.8" Heating Coil, Low Noise Hot Plate Single Electric Cooktops Countertop Stove with Timer |
|
| 10 | Instant Pot Duo 7-in-1 Mini Electric Pressure Cooker, Slow Rice Cooker, Steamer, Sauté, Yogurt Maker, Warmer & Sterilizer, Includes Free App with over 1900 Recipes, Stainless Steel, 3 Quart |
|
Sous vide, meaning “under vacuum” in French, is a cooking technique that involves sealing food in a bag and then cooking it in a precisely temperature-controlled water bath. Unlike traditional cooking methods where food is exposed to fluctuating temperatures, sous vide maintains a constant temperature, ensuring uniform cooking from edge to edge.
This method excels at delivering unparalleled texture and flavor. Because the food cooks gently at its target final temperature, it’s virtually impossible to overcook. Meats emerge incredibly tender and juicy, vegetables retain their vibrant color and crispness, and flavors are intensified. The essential equipment typically includes an immersion circulator to heat and circulate the water, a container for the water bath, and a way to seal your food, such as a vacuum sealer or zip-top bags.
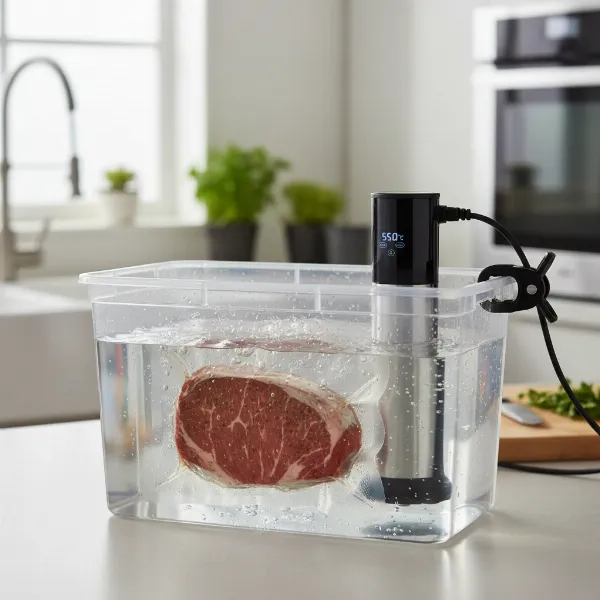 Sous vide cooking setup with food sealed in a bag submerged in a temperature-controlled water bath.
Can Your Electric Cooker Do Sous Vide? The DIY Approach
While dedicated sous vide machines offer precise, set-it-and-forget-it convenience, many electric cookers, such as slow cookers, rice cookers, or even some multi-cookers, can be adapted for sous vide cooking. The key differentiator is often the level of temperature control. Dedicated immersion circulators maintain water temperature within a fraction of a degree, which is crucial for perfect sous vide results and food safety.
General electric cookers typically have broader temperature ranges or “keep warm” settings that may not be exact enough for true sous vide. However, if your electric cooker has manual temperature settings or a “warm” function that maintains a reasonably stable heat, it can serve as the base for a DIY sous vide setup. The primary challenge, and your main focus, will be achieving and holding a consistent water temperature, which will likely require external monitoring and adjustment.
Essential Gear for DIY Electric Cooker Sous Vide
To successfully execute sous vide with an electric cooker, you’ll need a few additional tools to compensate for its inherent lack of precision.
- The Electric Cooker: A slow cooker, rice cooker, or multi-cooker with a “warm” setting or manual low-temperature control can work. Look for models that maintain a fairly consistent temperature on their lowest settings.
- External Thermometer: This is an absolute must. A high-quality, fast-reading digital thermometer will be your most important tool for monitoring the water bath temperature. You’ll need to check it frequently.
- External Temperature Controller (PID Controller – Optional but Recommended): For serious DIY sous vide enthusiasts, a PID (Proportional-Integral-Derivative) controller can be wired to your electric cooker. This device takes readings from a temperature probe and cycles power to your cooker to maintain a very precise temperature, mimicking a dedicated circulator. This takes some technical know-how but offers the best results for a non-dedicated machine.
- Food-Grade Bags: Vacuum seal bags are ideal for removing all air, but heavy-duty, freezer-safe zip-top bags can also be used effectively with the water displacement method.
- Water Displacement Method: To remove air from zip-top bags, slowly submerge the bag containing your food into a pot of water, letting the water pressure force the air out before sealing the bag just above the waterline. This creates a near-vacuum seal.
- A Container: Your electric cooker itself will be the container. Ensure it’s large enough for your food and enough water to fully submerge it.
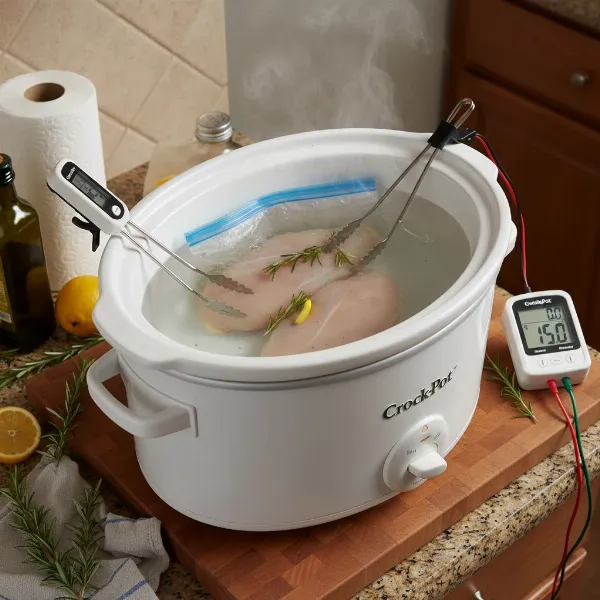 DIY sous vide setup using an electric slow cooker, a food bag in water, and an external digital thermometer for monitoring.
Setting Up Your Electric Cooker for Sous Vide
The setup for DIY electric cooker sous vide requires careful attention to temperature, as this is the most critical factor for both culinary success and food safety.
Preparation:
Begin by placing your electric cooker on a stable, heat-resistant surface. Fill it with water, ensuring there’s enough volume to fully submerge your food without overflowing when the food is added.
Temperature Control:
- Without a PID Controller: This method relies on manual vigilance. Turn your electric cooker to its lowest setting, or “warm.” Insert your external thermometer into the water. Allow the water to heat up, then begin to make small adjustments to your cooker’s setting or cycle it on and off manually to reach and maintain your target temperature. This requires constant monitoring and adjustment, as basic electric cookers are not designed for precise temperature regulation. Using a lid can help maintain heat and reduce evaporation.
- With a PID Controller: If you’re using a PID controller, connect it according to its instructions. Typically, the controller will plug into a wall outlet, and your electric cooker will plug into the controller. The controller’s temperature probe is then placed in the water bath. Set your desired temperature on the PID controller, and it will automatically cycle the power to your electric cooker to maintain that temperature with high accuracy. This is the closest you can get to a dedicated immersion circulator using an adapted appliance.
Heating the Water:
Regardless of your setup, allow sufficient time for the water to reach your target cooking temperature before adding your food. This can take anywhere from 30 minutes to an hour or more, depending on your cooker and desired temperature.
The Sous Vide Cooking Process in Your Electric Cooker
Once your water bath is ready, the cooking process is straightforward, following the standard sous vide steps.
Seasoning and Bagging:
Prepare your food by seasoning it as desired. For most meats and fish, salt and pepper are sufficient. You can add herbs, garlic, or a small amount of fat to the bag. Place the seasoned food into your chosen bag (vacuum-sealed or heavy-duty zip-top). Ensure as much air as possible is removed from the bag to allow for efficient heat transfer and to prevent the bag from floating.
Immersion:
Carefully lower your bagged food into the preheated water bath in your electric cooker. Make sure the food is fully submerged. If using zip-top bags, ensure the seal remains above the waterline to prevent water from entering. You may need to use a heavy plate or a heat-safe clip to keep the bag submerged if it tends to float.
Cooking Time and Temperature:
Refer to reliable sous vide time and temperature charts for your specific food item. The beauty of sous vide is that the cooking time is more forgiving than traditional methods, as the food won’t overcook. However, it still needs to cook long enough to reach the target internal temperature and, for certain foods, to tenderize. For instance, a medium-rare steak might cook at 130°F (54.4°C) for 1-4 hours.
Monitoring:
If you’re not using a PID controller, continually monitor the water temperature with your external thermometer throughout the cooking process. Make small, incremental adjustments to your electric cooker’s settings as needed to maintain stability. Consistency is key for food safety and optimal results.
The Crucial Finishing Step: Searing Your Sous Vide Masterpiece
While sous vide cooks food to perfect doneness, it doesn’t create the appetizing crust or caramelization that often defines a delicious meal. This is where the crucial finishing step of searing comes in.
Why Searing is Essential:
After its water bath, your food will appear uniformly cooked but often pale. Searing rapidly develops a flavorful, browned crust (Maillard reaction) and adds appealing texture that enhances the overall eating experience.
Methods for a Perfect Crust:
- Pan-Searing: Pat your sous vide food thoroughly dry with paper towels (moisture is the enemy of searing). Heat a cast-iron or heavy-bottomed pan over high heat with a high-smoke-point oil (like grapeseed or avocado oil). Sear the food for 60-90 seconds per side, until a beautiful crust forms. Add butter, garlic, or herbs to the pan during the last few seconds for extra flavor.
- Grilling: A hot grill can also provide excellent searing and smoky flavor.
- Torching: A kitchen torch can be used for precise searing, particularly useful for irregularly shaped items.
Remember, the goal of searing is to develop a crust quickly without significantly increasing the internal temperature of your perfectly cooked food.
Advantages and Limitations of DIY Electric Cooker Sous Vide
Utilizing an electric cooker for sous vide offers a cost-effective entry point into this cooking method, but it comes with its own set of challenges.
Pros:
- Cost-Effective: It allows you to experiment with sous vide without investing in a dedicated immersion circulator, utilizing an appliance you likely already own.
- Utilizes Existing Appliances: You get more utility out of your slow cooker or rice cooker.
- Good for Exploration: It’s a great way to learn the basic principles of sous vide before committing to more specialized equipment.
Cons:
- Lack of Precision: General electric cookers are not designed for the precise temperature control required for optimal sous vide results. This is the biggest hurdle.
- Temperature Fluctuations: Manual monitoring and adjustment mean the water bath temperature will likely fluctuate more, potentially impacting food safety and final texture.
- Constant Monitoring Required: Without a PID controller, you’ll need to frequently check and adjust the temperature, making it less convenient than a dedicated machine.
- Safety Concerns: Inconsistent temperatures, especially for longer cooks or certain foods, can pose food safety risks if the water bath drops below safe holding temperatures for extended periods.
- Not Suitable for All Recipes: Recipes requiring extremely tight temperature control or very long cooking times may be less successful or safe with a DIY setup.
Conclusion
Embarking on the journey of sous vide cooking with your electric cooker can be a rewarding and educational experience. While it demands a higher degree of vigilance and a few extra tools compared to using a dedicated immersion circulator, it offers an accessible way to harness the benefits of precision cooking. Understanding the core principles of temperature control, proper food bagging, and the crucial searing step are paramount to your success.
Embrace the learning curve, monitor your temperatures diligently, and you’ll be well on your way to enjoying incredibly tender and flavorful dishes. Remember that while a DIY setup is a fantastic starting point, investing in a dedicated sous vide circulator will ultimately provide the most consistent, precise, and worry-free results. Are you ready to elevate your home cooking and impress your palate with perfectly prepared meals?
Frequently Asked Questions
Can I use a slow cooker for sous vide?
Yes, a slow cooker can be adapted for sous vide, but it presents challenges due to its broader temperature range. You’ll need to use an external thermometer for accurate monitoring and manually adjust the settings or cycle the cooker on and off to maintain the target temperature as consistently as possible.
Is sous vide cooking safe with an electric cooker?
Safety is paramount. It can be safe if you strictly adhere to food safety guidelines, particularly maintaining consistent temperatures above 130°F (54.4°C) for meats. Inconsistent temperatures or prolonged cooking at unsafe temperatures can lead to bacterial growth. Constant monitoring with an accurate external thermometer is crucial.
What foods are best for beginners using this method?
Beginners should start with forgiving cuts of meat like chicken breast, pork chops, or medium-rare steaks, which have wider acceptable temperature ranges. Avoid delicate fish or items requiring extremely precise temperatures until you’re confident in your setup’s stability.
How do I maintain a consistent temperature?
The best way to maintain consistency without a dedicated circulator is by using a PID controller with your Electric Cooker. If manual, use a lid to minimize heat loss, frequently check with an external thermometer, and make small, careful adjustments to your cooker’s settings, turning it on and off as needed.
Do I need a vacuum sealer for sous vide?
No, a vacuum sealer is not strictly necessary. You can use the “water displacement method” with heavy-duty, freezer-safe zip-top bags. Submerge the bag with food into water, allowing the water pressure to push out the air, then seal it just above the waterline.