Achieving culinary perfection often hinges on one crucial element: precise temperature control. Whether you’re aiming for a perfectly crispy fried chicken or a rich, tender stew, understanding the right heat settings for frying and simmering is paramount. This guide will demystify the science behind these fundamental cooking techniques, helping you unlock incredible flavors and textures in your kitchen.
Understanding the Fundamentals: The Science of Heat in Cooking
Temperature in cooking isn’t just a number on a dial; it dictates chemical reactions, moisture retention, and overall texture. Too little heat, and food can become soggy or tough. Too much, and you risk burning the exterior while leaving the inside raw. Mastering the heat allows you to transform simple ingredients into extraordinary dishes, ensuring uniform cooking and optimal flavor development.
The Art of Frying: Achieving Golden Perfection
Frying involves cooking food in hot oil or fat, producing a desirable crispy exterior and a cooked, often juicy, interior. It’s a method that demands high, consistent heat to prevent the food from becoming greasy.
Ideal Frying Temperatures
|
Our Picks for the Best Electric cooker in 2026
As an Amazon Associate I earn from qualifying purchases.
|
||
| Num | Product | Action |
|---|---|---|
| 1 | Dezin Hot Pot Electric with Steamer Upgraded, Non-Stick Sauté Pan, Rapid Noodles Electric Pot, 1.5L Mini Pot for Steak, Egg, Fried Rice, Ramen, Oatmeal, Soup with Power Adjustment |

|
| 2 | Green 1L Mini Slow Cooker with Steamer Basket, 200W Smart Ceramic Electric Stew Pot, 24-Hour Timer & Auto Keep-Warm, Dry-Burn Protection, Kitchen Cooking Appliance |
|
| 3 | Pink 1L Ceramic Slow Cooker with Steamer Basket, 200W Mini Electric Stew Pot, 24-Hour Delayed Start & Auto Keep-Warm, Household Kitchen Safety Dry-Burn Protection Porridge & Soup Pot |
|
| 4 | Elite Gourmet EG808 8” x 8" Non-stick Electric Skillet, Dishwasher Safe with Tempered Glass Vented Lid, Rapid Heat Up, 600W, Black |
|
| 5 | Dezin Hot Pot Electric with Steamer Upgraded, Non-Stick Sauté Pan, Rapid Noodles Electric Pot, 1.5L Mini Pot for Steak, Egg, Fried Rice, Ramen, Oatmeal, Soup with Power Adjustment |
|
| 6 | Dezin Hot Pot Electric with Steamer Upgraded, Non-Stick Sauté Pan, Rapid Noodles Electric Pot, 1.5L Mini Pot for Steak, Egg, Fried Rice, Ramen, Oatmeal, Soup with Power Adjustment |
|
| 7 | Dezin Hot Pot Electric with Steamer Upgraded, Non-Stick Sauté Pan, Rapid Noodles Electric Pot, 1.5L Mini Pot for Steak, Egg, Fried Rice, Ramen, Oatmeal, Soup with Power Adjustment |
|
| 8 | AMZCHEF Portable Induction Cooktop 20 Temperature & Power Levels, 1800W Induction Stove Burner with 6.8" Heating Coil, Low Noise Hot Plate Single Electric Cooktops Countertop Stove with Timer |
|
| 9 | Dezin Hot Pot Electric Upgraded, Non-Stick Sauté Pan, Rapid Noodles Electric Pot, 1.5L Mini Portable Hot Pot for Steak, Egg, Fried Rice, Ramen, Oatmeal, Soup with Power Adjustment |
|
| 10 | Instant Pot Duo 7-in-1 Mini Electric Pressure Cooker, Slow Rice Cooker, Steamer, Sauté, Yogurt Maker, Warmer & Sterilizer, Includes Free App with over 1900 Recipes, Stainless Steel, 3 Quart |
|
The optimal temperature for frying varies slightly depending on the technique. For deep frying, where food is fully submerged in oil, the ideal range is generally between 350°F and 375°F (175°C to 190°C). If you’re shallow frying, using less oil, a slightly lower range of 350°F to 355°F (175°C to 179°C) is often recommended.
Why Temperature Control is Critical for Frying
Maintaining the correct oil temperature is crucial for the success of any fried dish.
- Too Low: If the oil temperature is too low, food will absorb excessive oil, resulting in a greasy, soggy texture that lacks crispiness. The protective crust won’t form quickly enough, allowing oil to penetrate the food.
- Too High: Conversely, if the oil is too hot, the food’s exterior will burn rapidly before the inside has a chance to cook through. High temperatures can also cause the oil to break down faster, potentially forming undesirable compounds.
Choosing the Right Oil for Frying
Selecting an oil with a high smoke point is essential for frying, as this indicates the temperature at which the oil begins to smoke and break down. Oils like canola, peanut, sunflower, and vegetable oil are excellent choices with smoke points typically above 400°F (204°C). While olive oil can be used, extra virgin varieties have a lower smoke point (around 375°F/190°C) and are less ideal for high-heat frying.
How to Measure Oil Temperature
The most accurate way to measure oil temperature is with a deep-fry or instant-read thermometer. However, if you don’t have one, several reliable methods can help:
- The Wooden Spoon/Chopstick Test: Dip the end of a dry wooden spoon or chopstick into the hot oil. If bubbles steadily form around the wood and rise to the surface, the oil is ready for frying. If the bubbling is vigorous, the oil is too hot; if there are no or very few bubbles, it needs more heat.
- The Bread Test: Drop a small (about 1-inch) cube of bread into the hot oil. If it turns golden brown in 30-40 seconds, the oil is likely in the ideal frying range of 350-375°F. If it browns instantly, the oil is too hot; if it absorbs oil and stays pale, it’s too cool.
- The Popcorn Kernel Test: Drop a single kernel of popcorn into the oil. If it pops, the oil is typically within the 325-350°F (163-177°C) range, signaling it’s close to or at the right temperature for many frying applications.
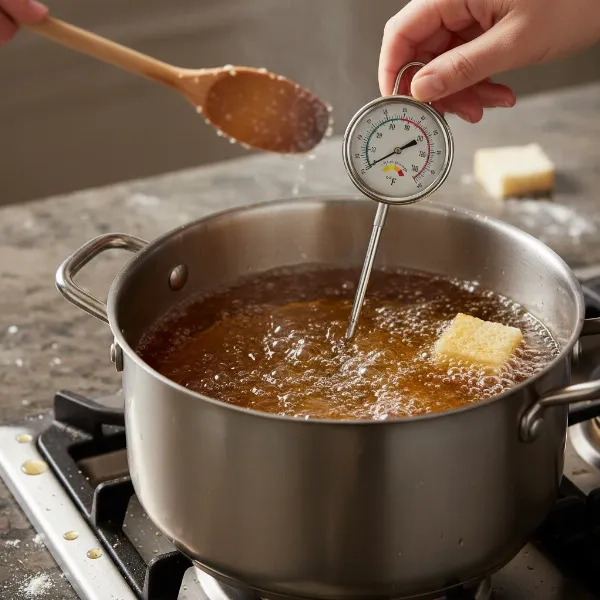 Hand holding a thermometer over a pot of hot oil, illustrating kitchen tests.
Frying Temperature Guide for Specific Foods
While the general range is helpful, some foods benefit from slight adjustments:
- French Fries: For perfectly crispy fries, many chefs recommend a two-stage frying process. Begin by frying at 320°F (160°C) for 3-4 minutes to cook the interior, then remove, allow them to cool slightly, and fry again at 356°F (180°C) for another 3-4 minutes to achieve a golden, crispy exterior.
- Chicken Pieces: Fried chicken generally cooks best between 350-375°F (175-190°C). Adjustments may be needed based on the size and thickness of the chicken pieces; smaller pieces might tolerate a slightly higher temperature and shorter cooking time.
Expert Frying Tips for Optimal Results
- Don’t Overcrowd: Frying too much food at once will drastically drop the oil temperature, leading to greasy results. Fry in batches.
- Dry Your Food: Excess moisture on food can cause violent splattering and also lower the oil temperature. Pat ingredients dry before frying.
- Season Generously: Fried foods often benefit from ample seasoning, both before and after frying.
The Gentle Embrace: Perfecting the Simmer
Simmering is a gentle cooking method that involves heating liquids just below their boiling point. It’s ideal for slow-cooking and developing deep, complex flavors without the aggressive agitation of a full boil.
What is Simmering?
When a recipe calls for simmering, you’re heating a liquid to a temperature where small bubbles slowly rise to the surface and gently break, with the surface appearing calm. This is distinct from a rolling boil, where large, rapid bubbles continuously break the surface.
Ideal Simmering Temperature Range
The perfect simmering temperature typically falls between 180°F and 205°F (82°C to 96°C). This range is comfortably below the boiling point of water, which is 212°F (100°C) at sea level.
Why Simmering Temperature Matters
Simmering is a cornerstone of many classic dishes due to its ability to:
- Develop Flavors: The prolonged, gentle heat allows ingredients’ flavors to meld and intensify over time without becoming muddled or overcooked.
- Achieve Tender Textures: For tougher cuts of meat or delicate ingredients, simmering slowly breaks down connective tissues or gently cooks proteins, resulting in incredibly tender and moist results. High heat would toughen them.
- Prevent Damage: The gentle movement of liquid protects delicate ingredients, like fish or certain vegetables, from breaking apart, which can happen during a vigorous boil.
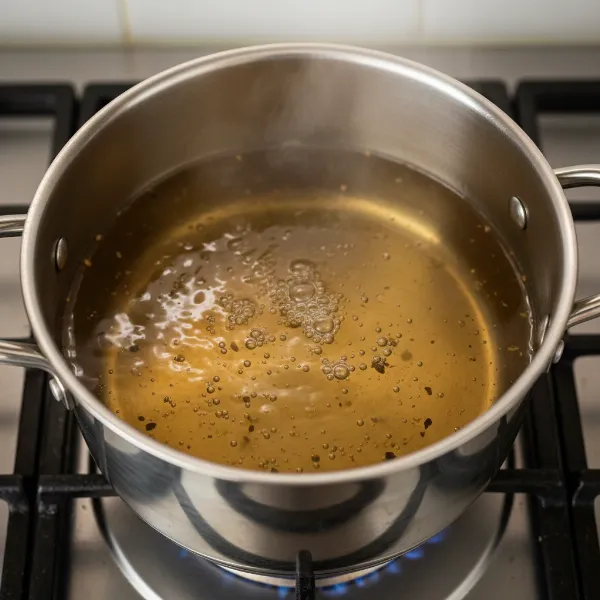 Close-up of a pot on a stove, showing liquid with small, gentle bubbles.
When to Simmer: Dishes that Thrive on Gentle Heat
Simmering is the go-to technique for a wide variety of dishes:
- Soups and Stews: Allows flavors to deepen and ingredients to tenderize beautifully.
- Broths and Stocks: Essential for extracting maximum flavor from bones and vegetables.
- Sauces: Helps reduce and thicken sauces to the perfect consistency while building flavor.
- Braising Meats: Slow, moist heat makes tough cuts melt-in-your-mouth tender.
- Poaching: Ideal for delicate items like eggs, chicken breasts, or fish, ensuring even, gentle cooking.
Achieving a Perfect Simmer on Your Stove
To achieve a perfect simmer, start by bringing your liquid to a boil, then reduce the heat to low or medium-low. On electric stoves with numbered dials, a simmer often falls around settings 3-5, though this can vary by appliance. Keep an eye on the surface for those characteristic small, lazy bubbles. If the liquid becomes too still, increase the heat slightly; if it starts to boil vigorously, reduce it.
Frying vs. Simmering: A Comparative Look
Here’s a quick comparison of these two essential cooking methods:
| Feature | Frying | Simmering |
|---|---|---|
| Temperature | 350-375°F (175-190°C) | 180-205°F (82-96°C) |
| Medium | Hot oil or fat | Liquid (water, broth, sauce) |
| Visual Cues | Sizzling, rapid bubble formation in oil | Small, slow bubbles rising, calm surface |
| Purpose | Crispy exterior, quick cooking | Tenderizing, flavor development, slow cooking |
| Typical Foods | Fried chicken, French fries, donuts, tempura | Soups, stews, sauces, braised meats, poached eggs |
Conclusion
Mastering the temperature settings for frying and simmering is a cornerstone of confident cooking. Whether you’re chasing the satisfying crunch of a perfectly fried dish or the comforting depth of a slow-simmered stew, precise heat control is your best tool. By understanding the optimal temperature ranges, the visual cues, and the underlying culinary science, you can consistently achieve professional-level results in your home kitchen. Don’t be afraid to experiment and trust your senses – with practice, these techniques will become second nature. What will you master next, the perfect sear or a delicate sous vide?
Frequently Asked Questions
What is the difference between a rolling boil and a vigorous simmer?
A rolling boil involves large, rapid bubbles continuously breaking the surface of the liquid, indicating a temperature of 212°F (100°C) at sea level. A vigorous simmer, while still active, will have more frequent small bubbles rising and breaking than a gentle simmer, but it still maintains a temperature below boiling, typically around 200-205°F (93-96°C), without the constant, turbulent movement of a full boil.
Can I reuse frying oil, and does temperature affect its lifespan?
Yes, high-quality frying oil can often be reused, but its lifespan is affected by temperature and what you’ve fried. Overheating oil can cause it to break down faster, reducing its reuse potential. Always strain cooled oil to remove food particles and store it in an airtight container in a cool, dark place.
What happens if I deep fry frozen food at the wrong temperature?
Frying frozen food at too low a temperature will cause it to absorb too much oil, becoming greasy and potentially soggy. Frying it at too high a temperature can result in a burned exterior with a still-frozen or undercooked interior. It’s crucial to maintain the recommended frying temperature, as frozen foods cause a significant temperature drop, so starting slightly higher may be beneficial to compensate.
How do high altitudes affect simmering temperatures?
At higher altitudes, atmospheric pressure is reduced, causing liquids to boil at lower temperatures. This means that water will reach its boiling point and simmer at a slightly lower temperature than at sea level. Recipes might require adjustments in cooking times or a slightly higher stove setting to achieve the desired simmering effect.
What kind of thermometer is best for frying?
For frying, a deep-fry thermometer that clips to the side of the pot is highly recommended as it allows you to continuously monitor the oil temperature. An instant-read thermometer can also be used, but you’ll need to remove it from the oil to read the temperature and re-insert it periodically.